Monday, July 23, 2018

How To Disable Write Protection on a Pendrives and Memory Cards Using Windows

How To Disable Write Protection on a Pendrives and Memory Cards Using Windows

"The drive is write protected"  When We try to copy paste files from Computer to External drive like pendrives or Memory card, It prompts the error.


You'll still be able to view files which are already stored on the drive, but you can't delete them (they sometimes seem to delete OK, but the next time you check, there they are again!).


Write protection being one of the infuriate issues to deal with when you're trying to leave the office for the day. Not able to move your files over onto a USB stick or drive is the last thing you want to deal with.


This posts concentrates on How to remove Write Protection on a Pendrives and Memory Cards.


Method 1:

Using REGEDIT.

1. Start-> Regedit-> click yes if you got any prompt

2. Now goto
HKEY_LOCAL_MACHINE\SYSTEM\CurrentControlSet\Control 
3. Now double click on the write protected option and Change the value data from 1 to 0.


Method 2:
DiskPart Command:
1. Open command prompt under administrative privileges
2. Now type DiskPart and click yes if you got any prompt.
3. Type list disk to check what all the devices connected to computer.
4. Type select disk #(where # is the number of USB drive with which you're getting the write-protected error)
5. Type attributes disk clear readonly.
6.Now you may close the command prompt, remove pendrive and re-plug the pendrive and check whether the issue is resolved.

Sunday, July 22, 2018

speed up your computer using notepad

Speed up your computer using notepad:

Notepad is a simple text editor available in windows.Its been in windows since windows 1.0.
We generally use notepad for basic text operations like copying some text from the or saving links .Its fast and simple to use.Do you that notepad can be used to run programs or command prompt commands.?The default extension for notepad is .txt .where (txt stand for text).In this tutorial we will show "you how to speed up your computer using notepad?"


lets go with some basics first:
Vbs stands for visual basic script edition.Its a scripting language which is developed by Microsoft  initially targeted for web developers.This script is basically available in every windows operating system till now.We are going to use this script to speed up your computer.Now lets see how to edit or make these scripts to make our computer run much faster.


There are many ways to speed up your computer.Upgrade your computer with latest hardware which is available in the market or by using some softwares.Since most of us like me cant afford to upgrade to a newer hardware we need to find some other alternatives.There are some alternatives available besides using software,which is by using notepad.We will be discussing two methods using notepad which can improve performance of your pc.
  1. One is by cleaning ram
  2. Other by manipulating string using notepad.

By Cleaning ram:

1.Create a text document:
Create a text document on desktop or any other drives which are easy to access.To create .txt file right click on desktop or any empty place incase if you are in folder or drive and click on new and select create text document.
2.Type the following code:
By typing this code you will cleaning ram.choose the code depending up o your ram.
freemem=(space51200000)      if you have 512 mb ram
freemem=(space102400000)    if you have 1024 mb ram 
freemem=(space204800000)    if you have 2048 mb ram
freemem=(space409600000 )   if you have 4096 mb ram
freemem=(space xxxx00000)   replace xxxx with the size of the ram in megabites.
3.Save the file with .vbs application:
Now click save as.Save the file name with .vbs extension.you can save it with any name unless you use .vbs extension and choose save as type as "All files."


after saving the document.close it and try to open it by double clicking.and now you will notice the difference.Even though it does not provide and interface for cleaning ram ,ram  will be automatically cleaned.

How to Format Pendrive or Drive using DiskPart

DiskPart:
              The diskpart command is a recovery console command that enables a user to delete and create partitions on their computer. Format disk is necessary before using. No matter what operating system you are using, it has a certain way to manage disks, when people create a new partition, they always do a format for it.

How to format disk partition with DiskPart:

              Normally, to format the disk partition, you can use the Disk Management tool, by getting right-click on the Manage option in Computer. If you would like to use a command line to format the drive, You will choose DiskPart, and it does have many advantages like deleting and creating new partitions. For example, if you would like to reformat a drive which had an operating system on the drive, you can find there are system partitions on the drive which cannot be formatted by Disk Management and cannot be seen in Windows Explorer. But, how to format disk using DiskPart?
Diskpart is an powerful tool which is used to manage disks by typing the relative syntax. You can format a local drive or an external hard drive for the use of file storage in your Windows OS environment. And here, you can see how to format hard disk using CMD step by step.
Tips:
Format disk partition will erase everything on it. It is necessary to make a full back if needed.
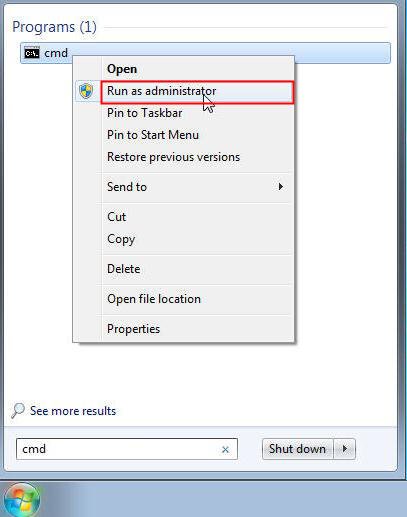
1. To use the command line to format a hard drive, you need to open the command prompt first. Here you can click Start, type "cmd", right click it and select "Run as Administrator", or you can press "WIN+X" and select Command Prompt (Admin) to open the command prompt.
Run as Administrator

2. Type diskpart to open the diskpart command prompt.
3.Type list Disk to check what are the disks attached to the computer.
4. Type Select Disk n (where n denotes disk number) to select disk to perform the actions.
5. Type list volume, press Enter, all the volume will be list.
6. Type select volume n, press Enter, the volume you want to format will be selected.
5. Then, type "format fs=ntfs quick label=test" and press Enter.  Then, the DiskPart format quick, like the screen shot shows.

Quick Note:
format : Command to format pendrive.
fs : type of file system which format pendrive with mentioned file system.
ntfs : New Technology File system.
label : Name for Pendrive or drive
.
Finally, you can create partition on the formatted partition, or assign a drive letter for it directly. You can type "exit" and press Enter to close the command prompt. Till now, you can see the new formatted drive in My Computer and take use of it.


How to Format drive or Pendrive using cmd


             Command prompt or cmd  is a powerful tool which presents in windows which executes command entered by the user.Command prompt can be used to control whole system. It is used to launch applications ,formatting drives to creating partitions and even shutting it down and restart the system. In this post we will be Knowing about formatting the a drive or pendrive or hard disk using command prompt which could probably remove everything from the drive, this may also removes the virus from the pendrive.
             Sometimes when you try to format the pendrive using normal way by Right clicking on drive and choosing the format option it may refuse to format the drive and you may not be able to use it unless you format it then you have to force the pendrive to get formatted and this can be done using command prompt with just a simple command.

Format Pendrive or hard disk using command prompt:

1.Press start and type cmd and hit "Enter"
2.Now connect your pendrive to the computer and type the command the command"format x:" where x is the location of  the device and press enter.
3.Once you type the command and press enter once you press enter it requests to insert a pendrive.if you have already connected it hit enter.
4.But it takes lot of time to format the pendrive.If you cant wait too long to format the pendrive then you can quick format it too.
5.If you want to make a quick format then type the command "format /q x:" where q in the command line stands for quick format while x is the pendrive location.once you press the enter key the process initialises and it will prompt you to assign a label to the pendrive.You can either assign a label or simple press enter.
6.Quick format will take less than 2 seconds to completely erase the data on the pendrive.


Click here to know how to Format using Diskpart.